RAG with Cloudera Streaming Operators
Updated:
Let’s build: StreamToVLLM — a local RAG setup that turns your Cloudera Operator deployed cluster into a real-time, streaming-aware knowledge base. No cloud APIs. No data leaving your machine. Just pure Cloudera Streaming Operators (Kafka + NiFi) + vLLM inference + Qdrant vector search.
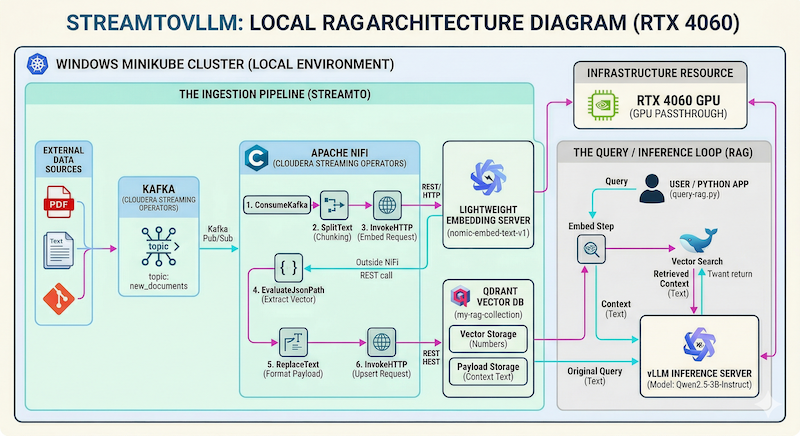
Perfect for this GPU (RTX 4060 8 GB VRAM) setup — it comfortably runs Qwen2.5-3B-Instruct while NiFi ingests documents in real time via Kafka.
We already have the Cloudera Streaming Operators stack, GPU-Accelerated Kubernetes: Setting up NVIDIA on Minikube, and some example Deploying vLLM with Qwen Llama on Minikube working from previous sessions — now let’s wire it all together into a complete local RAG pipeline.
💻 Prerequisites
You should have:
- Minikube running with GPU passthrough (RTX 4060 confirmed)
- Cloudera Streaming Operators (CSM + CSA + CFM) installed in namespaces
cld-streamingandcfm-streaming - NiFi UI accessible at
https://mynifi-web.mynifi.cfm-streaming.svc.cluster.local/nifi/
Quick GPU double-check (do this first!):
kubectl get nodes -o jsonpath='{.items[*].status.allocatable.nvidia\.com/gpu}'
# Should return: 1

# Run the official NVIDIA test pod
cat <<EOF | kubectl apply -f -
apiVersion: v1
kind: Pod
metadata:
  name: gpu-test
spec:
  restartPolicy: Never
  containers:
  - name: cuda-test
    image: nvcr.io/nvidia/k8s/cuda-sample:vectoradd-cuda12.5.0
    resources:
      limits:
        nvidia.com/gpu: 1
EOF

kubectl logs gpu-test -f
Expected output: Test PASSED ✅
Notice the response:
[Vector addition of 50000 elements]
Copy input data from the host memory to the CUDA device
CUDA kernel launch with 196 blocks of 256 threads
Copy output data from the CUDA device to the host memory
Test PASSED
Done
![]() Pro Tip! Keep
Pro Tip! Keep watch nvidia-smi running in another terminal — you’ll see your 4060 light up during inference.
📦 Step 1: Deploy vLLM Qwen Inference Server
We use the Qwen model now but you could use Llama here too.
Save as vllm-qwen.yaml:
apiVersion: apps/v1
kind: Deployment
metadata:
  name: vllm-server
spec:
  replicas: 1
  selector:
    matchLabels:
      app: vllm-server
  template:
    metadata:
      labels:
        app: vllm-server
    spec:
      containers:
      - name: vllm-server
        image: vllm/vllm-openai:latest
        env:
        - name: HF_TOKEN
          valueFrom:
            secretKeyRef:
              name: hf-token
              key: HF_TOKEN
        resources:
          limits:
            nvidia.com/gpu: 1
        args:
        - "Qwen/Qwen2.5-3B-Instruct"
        - "--quantization"
        - "bitsandbytes"
        - "--load-format"
        - "bitsandbytes"
        - "--gpu-memory-utilization"
        - "0.80"             # Fits comfortably in 6.92 GiB
        - "--max-model-len"
        - "2048"             # 2k is a solid sweet spot for 3B models
        - "--enforce-eager"
        volumeMounts:
        - name: shm
          mountPath: /dev/shm
      volumes:
      - name: shm
        emptyDir:
          medium: Memory
          sizeLimit: "2Gi"
---
apiVersion: v1
kind: Service
metadata:
  name: vllm-service
  namespace: default
spec:
  selector:
    app: vllm-server
  ports:
  - protocol: TCP
    port: 8000
    targetPort: 8000
  type: ClusterIP
Apply the Qwen YAML:
kubectl apply -f vllm-qwen.yaml
kubectl get pods -w
kubectl port-forward svc/vllm-service 8000:8000
Test with curl:
curl http://localhost:8000/v1/chat/completions \
  -H "Content-Type: application/json" \
  -d '{
    "model": "Qwen/Qwen2.5-3B-Instruct",
    "messages": [{"role": "user", "content": "Hello! Tell me a short joke."}],
    "temperature": 0.7
  }'
Notice the response:
{"id":"chatcmpl-bf9eab9a4c952c2d","object":"chat.completion","created":1774452848,"model":"Qwen/Qwen2.5-3B-Instruct","choices":[{"index":0,"message":{"role":"assistant","content":"Of course! Here's a quick one for you:\n\nWhy don't scientists trust atoms?\n\nBecause they make up everything!","refusal":null,"annotations":null,"audio":null,"function_call":null,"tool_calls":[],"reasoning":null},"logprobs":null,"finish_reason":"stop","stop_reason":null,"token_ids":null}],"service_tier":null,"system_fingerprint":null,"usage":{"prompt_tokens":37,"total_tokens":62,"completion_tokens":25,"prompt_tokens_details":null},"prompt_logprobs":null,"prompt_token_ids":null,"kv_transfer_params":null}
![]() Warning! If your curl command crashes the port forward, your vllm-server is not ready yet. Watch the vllm-server logs until you see
Warning! If your curl command crashes the port forward, your vllm-server is not ready yet. Watch the vllm-server logs until you see Application startup complete.
⚡ Ready for RAG! Your GPU pod is now the brain of the system.
🗄️ Step 2: Deploy Qdrant Vector DB
Save as qdrant-deployment.yaml:
apiVersion: apps/v1
kind: Deployment
metadata:
  name: qdrant
spec:
  replicas: 1
  selector:
    matchLabels:
      app: qdrant
  template:
    metadata:
      labels:
        app: qdrant
    spec:
      containers:
      - name: qdrant
        image: qdrant/qdrant:latest
        ports:
        - containerPort: 6333
        - containerPort: 6334
        volumeMounts:
        - name: qdrant-data
          mountPath: /qdrant/storage
      volumes:
      - name: qdrant-data
        emptyDir: {}
---
apiVersion: v1
kind: Service
metadata:
  name: qdrant
spec:
  selector:
    app: qdrant
  ports:
  - name: http
    port: 6333
    targetPort: 6333
  - name: grpc
    port: 6334
    targetPort: 6334
  type: ClusterIP
Apply the Qdrant YAML:
kubectl apply -f qdrant-deployment.yaml
kubectl port-forward svc/qdrant 6333:6333
Let’s use curl to test and to create our first sample collection to use later:
curl -X PUT "http://localhost:6333/collections/my-rag-collection" \
-H "Content-Type: application/json" \
-d '{"vectors": {"size": 768, "distance": "Cosine"}}'
Notice the response:
{"result":true,"status":"ok","time":0.098496962}
![]() Pro Tip! With
Pro Tip! With port-forward on visit http://localhost:6333/dashboard and have a look at Qdrant.
🔢 Step 3: Lightweight Embedding Server
Save as embedding-server.yaml:
apiVersion: apps/v1
kind: Deployment
metadata:
  name: embedding-server
spec:
  replicas: 1
  selector:
    matchLabels:
      app: embedding-server
  template:
    metadata:
      labels:
        app: embedding-server
    spec:
      dnsPolicy: ClusterFirstWithHostNet
      containers:
        - name: tei-container
          image: ghcr.io/huggingface/text-embeddings-inference:cpu-1.5
          # This is the magic part: it forces the token into the binary's face
          command: ["/bin/sh", "-c"]
          args:
            - |
              text-embeddings-router \
              --model-id nomic-ai/nomic-embed-text-v1 \
              --port 80 \
              --hf-api-token "[hf-token]"
          ports:
            - containerPort: 80
          resources:
            limits:
              memory: "2Gi"
              cpu: "2"
          volumeMounts:
            - name: model-cache
              mountPath: /data
      volumes:
        - name: model-cache
          emptyDir: {}
---
apiVersion: v1
kind: Service
metadata:
  name: embedding-server-service
spec:
  selector:
    app: embedding-server
  ports:
    - protocol: TCP
      port: 80
      targetPort: 80
  type: ClusterIP
I had some difficulties in getting the hf model and token secret into the mix during pod creation. The working setup I ended up with was to download the model locally, mount that during pod creation, and explicitly use the hf-token string.
Supporting Commands:
mkdir -p /mnt/c/hf-models/nomic-embed
cd /mnt/c/hf-models/nomic-embed
python3 -c "from huggingface_hub import snapshot_download; snapshot_download(repo_id='nomic-ai/nomic-embed-text-v1', local_dir='/mnt/c/hf-models/nomic-embed', token='[hf-token]')"
minikube mount /mnt/c/hf-models/nomic-embed:/mnt/c/hf-models/nomic-embed
Apply the Embedding Server YAML:
kubectl apply -f embedding-server.yaml
kubectl port-forward svc/embedding-server-service 8080:80
Test with curl:
curl -X POST http://localhost:8080/embed -d '{"inputs":"The streaming pipeline is finally complete."}' -H 'Content-Type: application/json'
Notice the response:
[[0.04619594,-0.0090487795, ..]]
🌊 Step 4: Document Ingestion with NiFi
If vLLM is the brain, Apache NiFi is the nervous system. We need to get data from our sources, publish that data to Kafka, then Consume it, chunk it, turn it into vectors, and store it in Qdrant — all within NiFi on kubernetes.
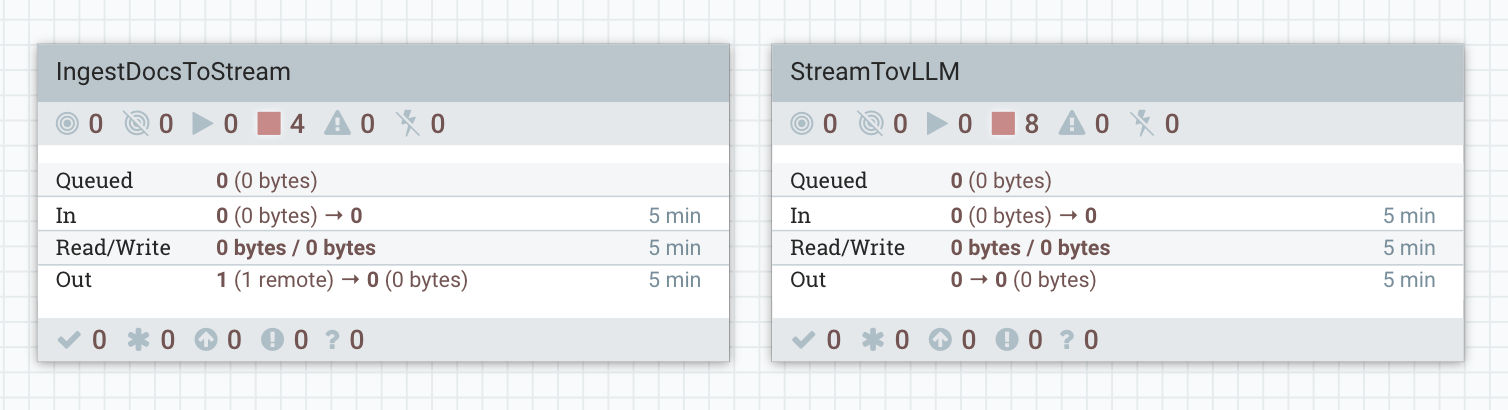
To make this easy, I’ve exported the complete NiFi flow as a JSON file: StreamToVLLM.json. You can download it and import it directly into your NiFi UI by dragging a new Process Group onto the canvas and uploading the flow definition file.
![]() NiFi Flow Definition File The fully operational flows are here: NiFi Templates.
NiFi Flow Definition File The fully operational flows are here: NiFi Templates.
🛠️ StreamTovLLM NiFi Flow
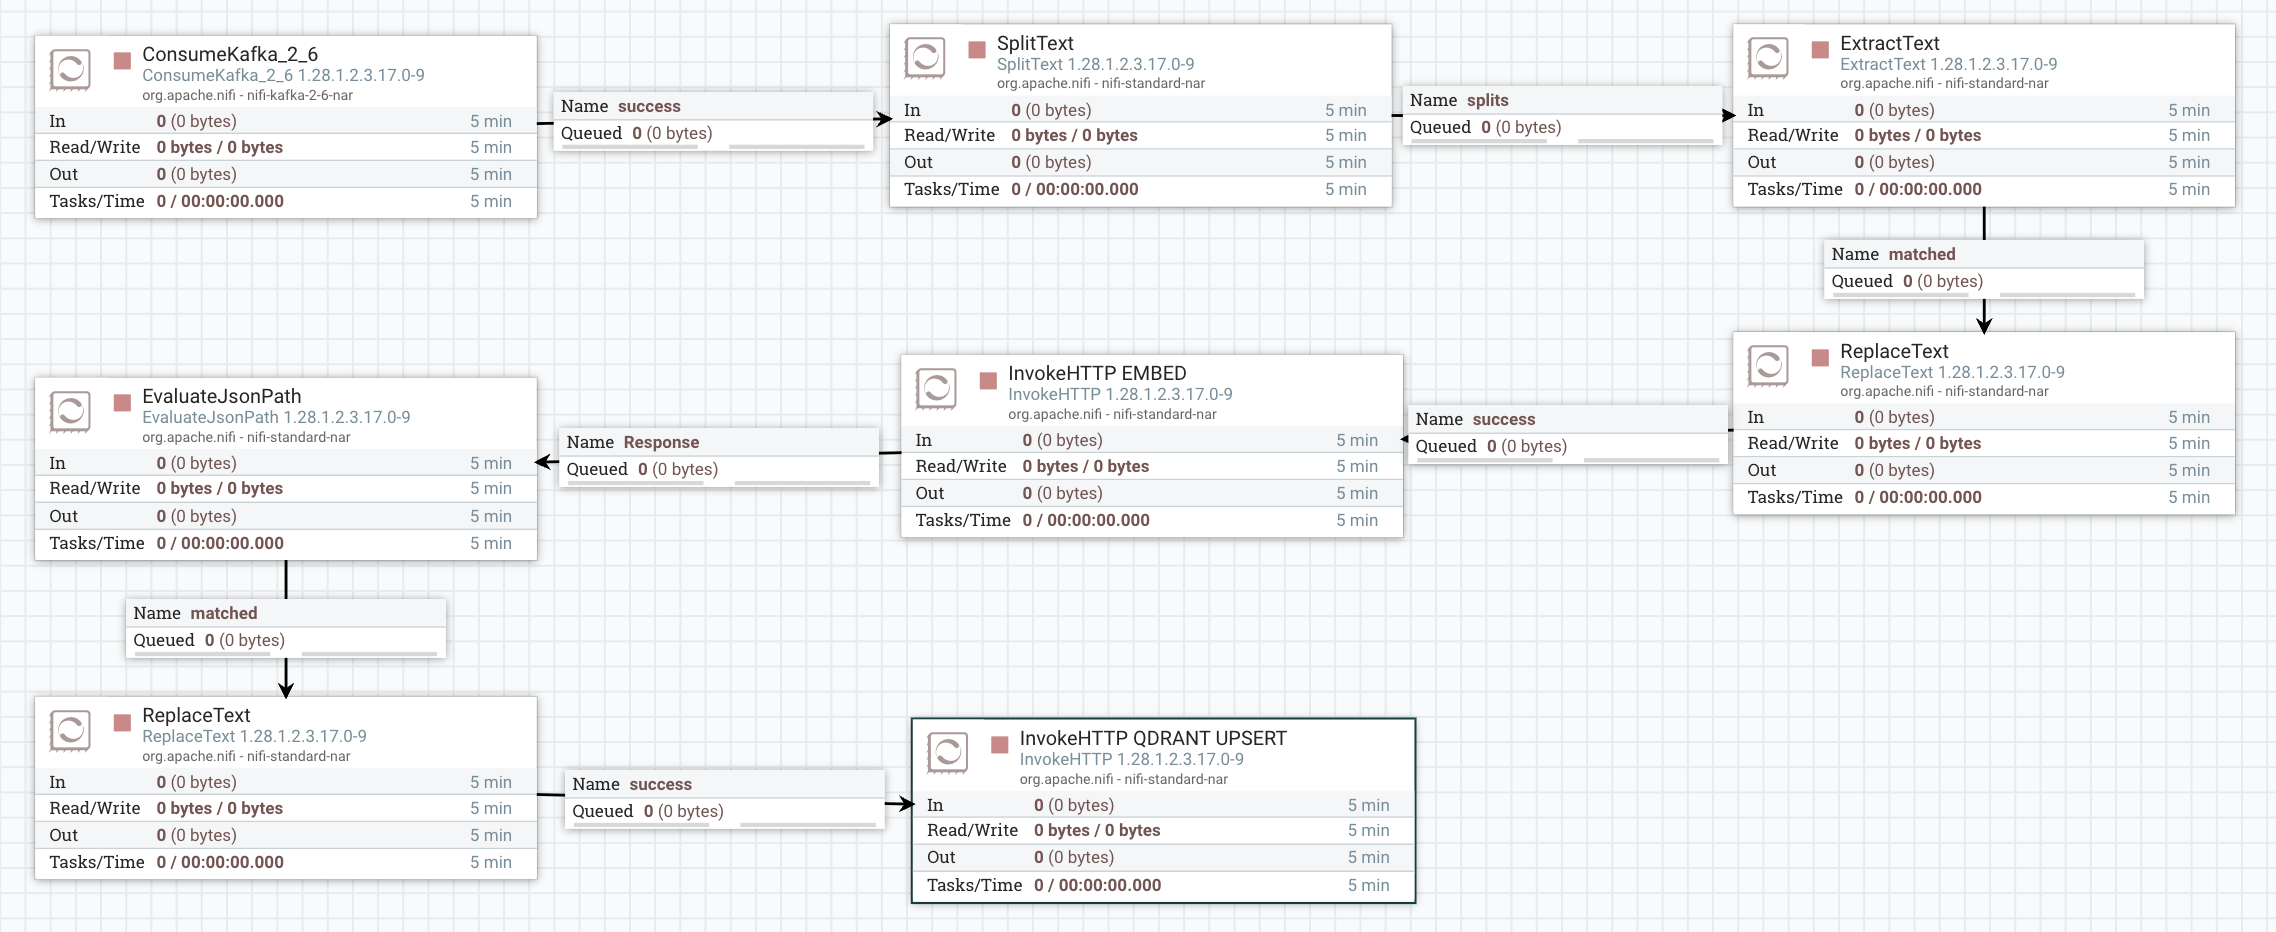
The flow processes each document through a “Retrieve-then-Generate” loop:
-
ConsumeKafka_2_6: Ingests raw text from the
new_documentstopic using the#{Kafka Broker Endpoint}parameter. - SplitText: Chunks the incoming data into 20-line segments to ensure the context remains efficient for the 3B model.
-
ExtractText: Place original content into
${content}attribute for replaceText (Qdrant) -
ReplaceText (Format for Embedding): Wraps the text chunk into the JSON format required by the embedding server:
{"inputs": "$1"}. -
InvokeHTTP (Embed): Calls the
embedding-serviceto generate a 768-dimension vector. -
EvaluateJsonPath: Extracts the resulting vector from the JSON response into a FlowFile attribute named
vector_data. - ReplaceText (Qdrant): format the body required for Qdrant Upsert.
- InvokeHTTP (Qdrant Upsert): The flow upserts the original chunk and its embedding into Qdrant so the system “learns” the document for future queries.
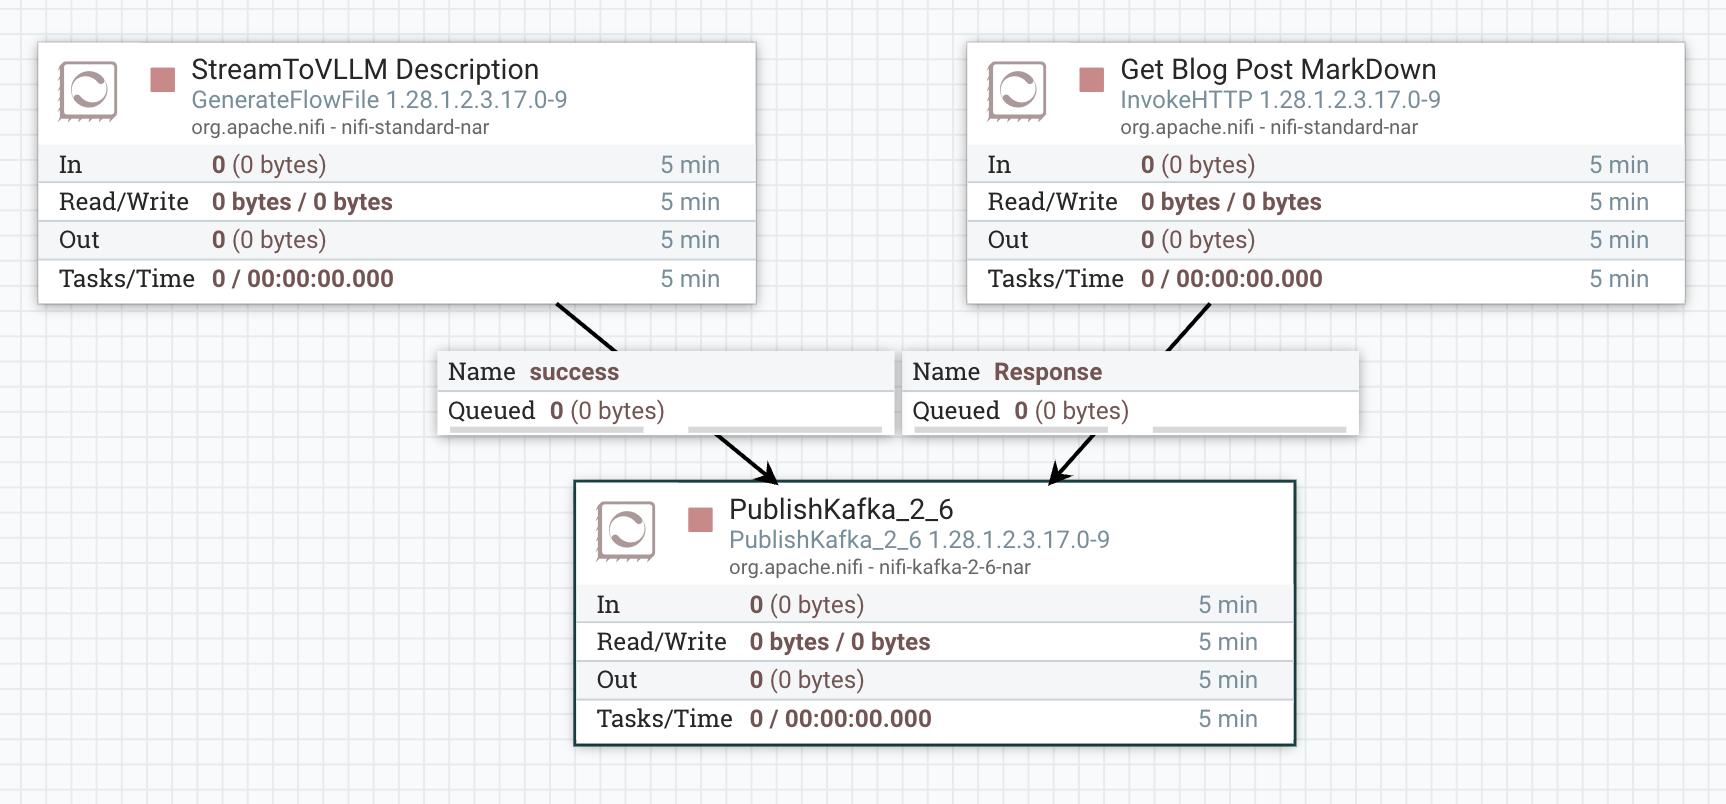
🛠️ IngestToStream NiFi Flow
This flow is used to route incoming data sources to our StreamTovLLM kafka topic new_documents.
- GenerateFlowFile: Sends a simple description of StreamToVLLM to Kafka.
-
InvokeHttp: Sends the entire markdown file for
RAG with Cloudera Streaming Operators(this) blog post. -
PublishKafka_2_6: Publishes our raw content to the
new_documentstopic.
![]() Careful! The scheduling for both top processors is 1 day. Do not keep the ingest running. You only need to ingest one example or the other. If you do ingest too much, delete the collection, and remake it to start over.
Careful! The scheduling for both top processors is 1 day. Do not keep the ingest running. You only need to ingest one example or the other. If you do ingest too much, delete the collection, and remake it to start over.
![]() Start the
Start the StreamTovLLM Flow. Next, send 1 flowfile (Run Once) to PublishKafka in IngestToStream — the document will now stream through NiFi and land in Qdrant and able to be used as context in calls to our vllm service!
🌊 Step 5: Query Time — Ask Questions!
What better way to test, than to ask our model What is StreamTovLLM?
Remember the first inquiry to the model is that it does not know anything about StreamTovLLM as expected:
=== ANSWER ===
I apologize, but there seems to be an error in the term you've provided ("streamtovllm"). It appears to be a misspelling or incorrect combination of words. The correct term might be Streamlit (a popular open-source platform for building user interfaces for machine learning applications) or llama (which could refer to Llama.cpp, a C++ library for machine learning). Could you please clarify or provide more context about what "streamtovllm" is supposed to be?
Now after we have executed our NiFi Flow when we test with curl:
curl -X POST "http://localhost:6333/collections/my-rag-collection/points/scroll" -H "Content-Type: application/json" -d '{"limit": 1, "with_payload": true}'
Notice the response:
{"result":{"points":[{"id":"ee6a5070-0add-4e43-b218-9d64eeab3053","payload":{"text":"StreamToVLLM is a specialized data engineering framework. nIt connects Apache NiFi to vLLM inference servers. nThe system uses Qdrant as a vector database to store technical blog content. nThis allows for local RAG (Retrieval-Augmented Generation) on Windows WSL2 machines. nThe main goal of the project is to demonstrate high-performance streaming AI nusing Cloudera Streaming Operators and dedicated GPU hardware.","source":"kafka-stream","timestamp":"Wed Mar 25 15:24:32 GMT 2026"}}],"next_page_offset":null},"status":"ok","time":0.000567914}
Now, lets go a bit further and build a simple python script to ask the same question. Save as query-rag.py:
import requests

def ask(question):
    # 1. Embed
    emb = requests.post("http://localhost:8080/embed", json={"inputs": question}).json()[0]

    # 2. Search Qdrant
    search = requests.post("http://localhost:6333/collections/my-rag-collection/points/search",
                           json={"vector": emb, "limit": 1, "with_payload": True}).json()

    results = search.get("result", [])
    raw_text = results[0]["payload"].get("text", "") if results else "No context."

    # --- THE ESCAPE HATCH ---
    # If the text starts with '[', it's a vector. We don't want it.
    if str(raw_text).startswith("["):
        print("[!] Warning: Found vector trash in text field. Ignoring it.")
        context = "Reference data is currently being re-indexed."
    else:
        # Force the context to be tiny (500 chars) to guarantee we stay under 4096 tokens
        context = str(raw_text)[:500]

    # 3. vLLM Call
    payload = {
        "model": "Qwen/Qwen2.5-3B-Instruct",
        "messages": [
            {"role": "system", "content": "Briefly answer using this context."},
            {"role": "user", "content": f"Context: {context}\n\nQuestion: {question}"}
        ],
        "max_tokens": 100
    }

    resp = requests.post("http://localhost:8000/v1/chat/completions", json=payload)

    if resp.status_code == 200:
        print("\n=== ANSWER ===")
        print(resp.json()["choices"][0]["message"]["content"])
    else:
        print(f"Error: {resp.text}")

ask("What is StreamToVLLM?")
Notice the well informed response:
python3 query-rag.py

=== ANSWER ===
StreamToVLLM is a specialized data engineering framework that connects Apache NiFi with vLLM inference servers, enabling local retrieval and augmentation generation on Windows WSL2 machines using Qdrant for storing technical blog content. Its primary goal is to showcase high-performance streaming AI using Cloudera Streaming Operators and dedicated GPU hardware.
Boom — ![]() instant, context-aware answers from your live streaming documents.
instant, context-aware answers from your live streaming documents.
💻 Terminal Commands For This Session
# Look at logs
kubectl logs gpu-test -f
kubectl logs -l app=vllm-server --tail 300

# Chained port forward
kubectl port-forward svc/qdrant 6333:6333 &
kubectl port-forward svc/vllm-service 8000:8000 &
kubectl port-forward svc/embedding-server-service 8080:80 &

# Delete the collection
curl -X DELETE "http://localhost:6333/collections/my-rag-collection"
# Recreate it fresh
curl -X PUT "http://localhost:6333/collections/my-rag-collection" \
-H "Content-Type: application/json" \
-d '{"vectors": {"size": 768, "distance": "Cosine"}}'

# Delete YAMLS
kubectl delete -f vllm-qwen.yaml
kubectl delete -f qdrant-deployment.yaml
kubectl delete -f embedding-server.yaml
![]() YAMLS! You can find all the
YAMLS! You can find all the yaml for working with Cloudera Streaming Operators in my GitHub Repo.
 The “StreamToVLLM” Takeaway
This project isn’t about building a final product; it’s about establishing a foundational dev pipeline that actually works on local hardware. By wiring these components together on kubernetes, we’ve brought a local GPU for functional development with Cloudera Streaming Operators.
- Foundational RAG Plumbing: We’ve built the “boring” but essential infrastructure—moving data from a stream, through a vectorizer, and into a searchable brain—all within a single Minikube cluster.
- The Power of Context: By chunking and embedding our own data, we’ve moved the LLM from “guessing” to “referencing.” We aren’t just asking Qwen to be smart; we’re giving it an open-book exam using the specific context we’ve provided.
- Unlocking the Sandbox: The real win here isn’t the chatbot—it’s the capability. Now that the pipeline exists, you can swap models, change embedding strategies, or pipe in entirely different data sources (Git, Jira, Slack) to see how they interact with local inference.
- Zero-Cost Iteration: Because this is 100% local, we can break things, re-index the collection, and run 1,000 test queries in iterations.
📚 Resources & Further Reading
- Qwen2.5-3B-Instruct (Hugging Face)
- nomic-embed-text-v1 (Hugging Face)
- Text Embeddings Inference (TEI)
- Qdrant Vector Database
- Qdrant GitHub Repository
- Cloudera Streaming Operators
- GPU-Accelerated Kubernetes: Setting up NVIDIA on Minikube
- Deploying vLLM with Qwen Llama on Minikube
RAG with Cloudera Streaming Operators
Please reach out to schedule a discussion if you would like a deeper dive, hands on experience, or demos of the integration between these components.